
The pandemic will be remembered as a muddled year for businesses and economies. changed in a fortnight, with the announcement of lockdown many businesses were coerced to shut down for several days. Micro entrepreneurs and small businesses bore the brunt of the pandemic, as they were not equipped enough to go online.
Meanwhile, India’s print media industry too could not insulate itself from the pandemic crisis. With newspaper circulation stalled, there was hardly any revenue generation for a long period of three months that led to layoffs of many journalists and the shutdown of regional newspapers. Renowned media houses such as The Hindu laid off 100 journalists with the closing of its Mumbai edition. Times of India too followed the shutdown suit by closing its Sunday special Times Life.
Grappling through pay cuts and layoff, freelancing jobs for several journalists is appearing to be a glimmer of hope and is also paving the path for a new set of micro-entrepreneurs and gig workers to run individual businesses and work on different projects respectively. The gig economy in India as per ASSOCHAM in January 2020 has estimated that it would grow at a compound annual growth rate of 17 percent to $455 billion by 2023.
Monetizing the online presence
With numerous website and blog building tools such as Wix, WordPress, and e-commerce store building tools for example Shopify and Woocommerce at affordable costs, micro-entrepreneurs operating in verticals as psychotherapy, Yoga, freelance writers, content creators, pet food shops, etc are launching their products and services online. However, with the best use of templates, images and designs the work does not end there. The website or the blog site created will be of no use unless we add the business flavour to generate revenue from it. The most challenges an independent business owner counters is to generate sales when any visitor lands up on the site. However, content is abundant around how to generate conversions but monetizing the site, be it a blog site or website through digital payments, is yet a question mark. For new independent businesses, going live with payment gateways similar to e-commerce sites such as Flipkart or Myntra is an arduous task, as it demands technical expertise. One needs to build a complete checkout flow, integrate the payment gateway and buy cloud space to store the customer data which is difficult to achieve in limited time, resources, and a shoestring budget. The process of integrating payment gateway is easy for established business owners or entrepreneurs as they are backed by investments for which they can hire website developers and digital marketing agencies to take care of the entire process on an online platform. Payment buttons here can help the new entrepreneurs to monetize their sites in no time.
‘‘
The gig economy in India as per ASSOCHAM in January 2020 has estimated that it would grow at a compound annual growth rate of 17 percent to $455 billion by 2023.
Razorpay’s Payment Button
Razorpay has developed a customised payment solution’ Payment Button’. It is a Do-It-Yourself solution that is designed for everyone to accept online payments by adding a payment gateway along with an integrated checkout on the website.
Why Should You Choose Razorpay’s Payment Button?
- It is a quick payment solution that can be added to any webpage not requiring integration efforts.
- Creation of a payment button in Razorpay does not involve a tech expert.
- The payment buttons are mobile-friendly that can be embedded without any coding requirement.
- It offers a quick payment solution that suits any business vertical.
- The payment button goes live in 5 minutes after embedding.
- The payment button can offer more than 100 payment modes including credit/debit cards, netbanking, UPI, wallets and enables international payments.
- Payment through Razorpay’s payment buttons offers a smooth experience to the customers as its redirection-less experience reduces drop-off rates on both mobile and desktop.
- Razorpay’s intuitive reporting system helps business owners to get detailed insights on each item sold, based on real-time transactions from the dashboard to aid in better business decision making.
- We can create any number of payment buttons that we can add to the website along with required details and descriptions for each one of the items.
- After payment, Razorpay helps businesses to send automated receipts to customers without any manual intervention and is compatible with website builders and content management tools.
Types of Payment Buttons available on Razorpay
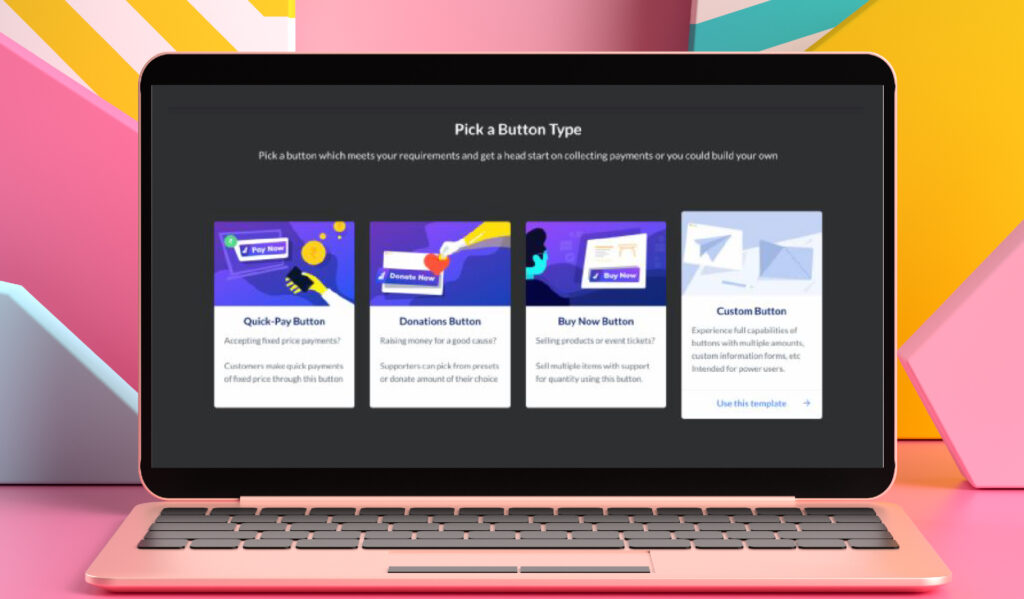
- Quick Pay Button: Embedding Quick Pay Button on the websites helps customers to make quick payments for a fixed amount by their preferred online payment method such as card, netbanking, wallet, etc.
- Donate Button: Several NGOs and charitable organisations can use this button to accept donations with the pre-decided amount or can allow the customer a ‘Pay -as -you -Like’ option, where they can type the desired amount to pay.
- Buy now Button: This payment button is mostly suitable for event organizers, product, or service sellers. This button accepts payments of multiple items with varying quantities.
- Custom Button:This is designed for power users with capabilities for different amount types, custom forms, etc. It gives the business the liberty to create, customise and publish payment buttons without any technical knowledge and offering a seamless experience to the customers.
Businesses Which Can Make Use Of Payment Buttons
Below are various business verticals that can use payment buttons to accept payment from customers :
- Non-Governmental Organizations(NGO) and Charitable trusts: The payment button for NGOs will prove to be beneficial since the payment button supports more than 100 payment models as well as international payments. Here, NGO can either select a minimum amount that is to be donated or can leave it free for the patrons to enter the amount. After the donation has been successful, the buttons have an automated receipt feature that can send 80G receipt in PDF either by saving time and resources. We can also get donor information such as the PAN number that comes with an inbuilt validation check. NGO should select the ‘Donate Now’ payment button.
- Event Organisers: An event organizer that is selling tickets for a particular event. For example, if you are conducting a stand-up comedy event and want to sell tickets online, the event organizers can create a ‘ book ticket or buy now button for a fixed monetary amount to sell tickets. They can also create payment buttons of their choice by using the ‘ custom button’.
- Small Businesses: Small businesses such as gift shops, bakeshops, stationery shops, handicraft shops, pottery, pickle, local Kirana shops, private fashion labels can add the payment button ‘ Buy Now’ button to their site. Businesses to avoid overselling or underselling of stock can define demarcations for each item for easy inventory management.
- Educational institutes: Schools, colleges, and institutes can embed the “Collect Fees’ payment button in the websites to collect fees online from students.
- Individuals: Individuals such as digital content creators, clinics, or a freelance writer can monetize their blog sites and websites using payment buttons.
Creating the payment buttons on Razorpay
To understand how to create payment buttons for your blog or website, we need to have the below requisites:
- Create and sign up for a Razorpay account.
- Login into the Razorpay dashboard to complete the Know Your Customer requirements.
- To test the payment button, Razorpay’s dashboard has test and live modes. The test mode is a replication of Razorpay in a sandbox environment which becomes available as soon as we complete the sign-up process. It allows you to test all aspects of your integration before you go live. The payment button created in the test mode does not go live and after thorough testing of the payment button, we can switch to the live mode and start accepting payments from the customer. Sometimes, payment Buttons created in the test mode do not appear in the live environment, hence one must create a new Payment Button on live mode.
- Understanding the payment flow
Adding the Payment Buttons
- Go to the Razorpay dashboard to select the payment button option that appears in the left column. On clicking it, you will be able to see the ‘Create Payment Button’ that appears on the right side of the screen.
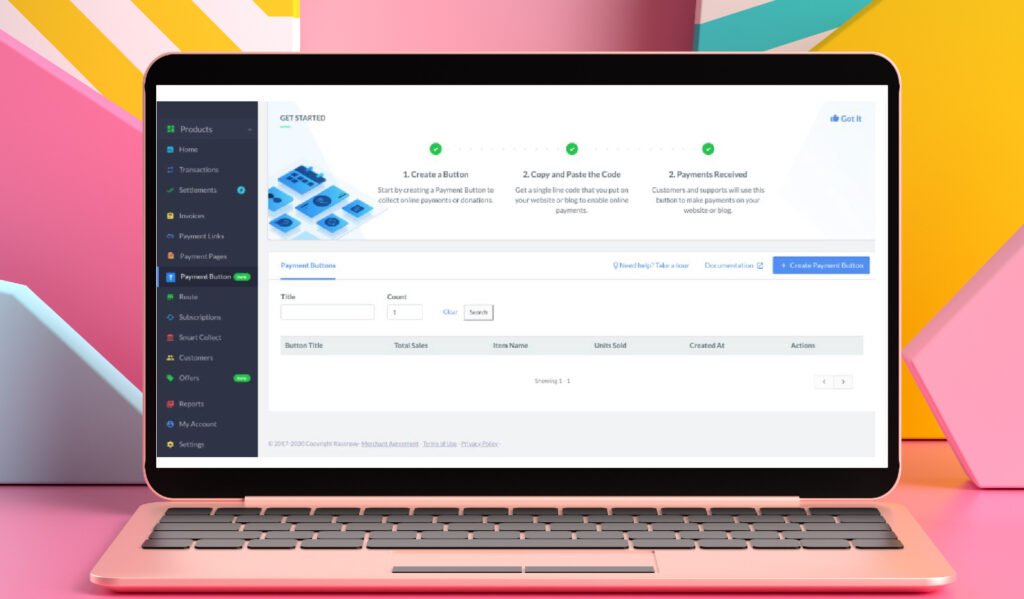
- On clicking the ‘Create Payment Button’ it will display options of four button templates -Quick Pay, Buy Now, Donations and custom.
- Choose the button that you want to select for your business.
- Fill in the button details where you can select the fixed amount that is needed to pay and a button label which is a text on button such as – Pay now, Buy me a coffee now, etc.
- For the ‘buy now’ payment button, business owners get a separate section for setting the amount details for different products. For example- I own a flowers and gift shop that sells bouquets. It also has a package that sells chocolates with bouquets which is optional and chargeable if selected. Here, we can set two amount details for bouquets individually and another for chocolates under the label button ‘ Add Chocolate’. Also, to manage oversell or undersell, we can control how much quantity one can order by selecting the quantity limit in the advanced options.
- After adding the button details configure the information such as email id and contact that must be entered by the donor for payment. NGOs can add one input field of PAN number.
‘‘
To test the payment button, Razorpay’s dashboard has test and live modes. The test mode is a replication of Razorpay in a sandbox environment which becomes available as soon as we complete the sign-up process.
Select a Button Theme
Businesses can select a button appearance from the below available themes at Razorpay-
- Razorpay Dark
- Razorpay Light
- Razorpay Outline
- Brand Color
- Review the details entered in the button, amount, and customer details. To make changes one can navigate to the button details, amount details, and customer details to make changes, and click ‘ Create Button’.
- Upon completion of these steps, the button code in HTML appears. Copy this code and add it to your webpage.
Post Payment actions
After payment is successfully made, we can send them a payment confirmation using:
- An automated payment receipt, for NGOs they can enable the 80-G payments option.
- Showing them a custom message
- Redirecting them to another page showing that payment is done.
Thus, small businesses can monetize their blog sites or websites using payment buttons offering a hassle-free payment experience to customers. So, without much ado, get started with payment buttons.


